Introduction
Sass is the perfect modern solution for maintaining many large complex CSS files, and keeping the CSS code DRY; with many developers using Sass now to overcome these maintenance problems. If you have never heard of Sass and want to learn more then look at the sections below. The official Sass website describes Sass as:
Sass lets you use features that don’t exist in CSS yet like variables, nesting, mixins, inheritance and other nifty goodies that make writing CSS fun again.
Once you start tinkering with Sass, it will take your preprocessed Sass file and save it as a normal CSS file that you can use in your web site.
Sass works by compiling preprocessed .scss files into .css files which can then be utilised in your web project; however Visual Studio 2015 does not include this compiling functionality out of the box (however strangely it allows you to add SCSS files). Natively Sass compilation works by installing the Sass software and then building the CSS file outputs using command line syntax such as:
sass input.scss output.css
How to use Sass with Visual Studio 2015
Using Sass in your ASP.NET web projects in Visual Studio 2015 is easy due to an extension called ‘Web Compiler’. To add the extension follow the instructions below:
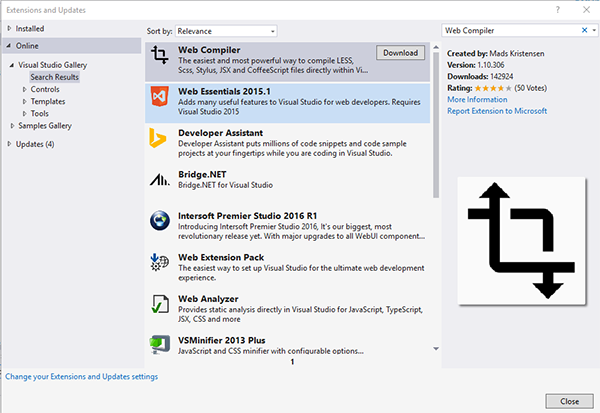
1. Install and download the Web Compiler (https://visualstudiogallery.msdn.microsoft.com/3b329021-cd7a-4a01-86fc-714c2d05bb6c?SRC=VSIDE) within Visual Studio 2015 from Tools > Extensions and Updates > click on ‘Online’ on the left > Search for Web Compiler
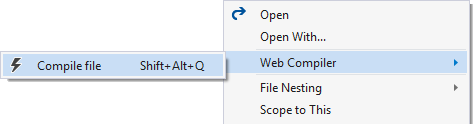
2. Right-click and on your .scss file in Solution Explorer to setup compilation.
A file called compilerconfig.json is created in the root of the project. This file let’s you modify the behaviour of the compiler.
Right-clicking the compilerconfig.json file let’s you easily run all the configured compilers.
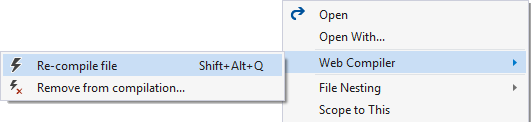
Making an amendment and saving any .scss files now will result in the automatic compile of css files in your project.
How to compile all SCSS files on Build?
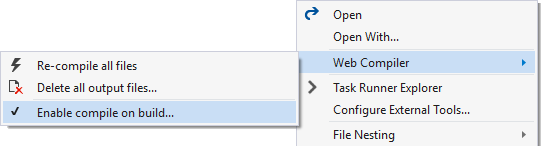
1. In your ASP.NET projects you can enable compilation as part of the build step by right-clicking on the thecompilerconfig.json file to enable it.
A NuGet package will be installed into the packages folder without adding any files to the project itself. The NuGet package contains an MSBuild task that will run the exact same compilers on the compilerconfig.json file in the root of the project.
What could my compilerconfig.json look like?
The following example compilerconfig.json file is showing the building of a fictitious main.scss file:
[
{
‘outputFile’ : ‘Content/main.css’,
‘inputFile’ : ‘Content/main.scss’,
‘minify’ : {
‘enabled’ : true
},
‘includeInProject’ : true,
‘options’ {
‘sourceMap’ : true
}
}]
The code above will automatically generate on build a main.css file and a main.min.css and include it as part of the project.
How could using Sass improve the maintenance of my CSS?
Adding Sass to your web project allows you to utilise the following features which are not yet available in CSS3:
1. Variables
2. Nesting
3. Partials
4. Import
5. Mixins
6. Extend & Inheritance
7. Operators
8. Functions
The list above is broken down below with code examples to show the real world benefits of each of these awesome features.
Variables
Variables in Sass work just like variables in most other languages; meaning that you can store a value in the variable and reuse the value throughout your CSS code. This becomes very useful when you want to store a particular colour value in a variable, for example, and use the value throughout your CSS; rather than having the same colour value coded multiple times. From a maintenance perspective this is fantastic as you only need to change the value in one place. Let’s have a look at an example below:
$main-colour: #CCC;

body {
color: $main-colour;
}
.info {
color: $main-colour;
}
Once processed using Sass the following CSS file will be generated:
body {
color: #CCC;
}

.info {
color: #CCC;
}
Nesting
Nesting in Sass allows you to nest your code in a similar hireacheal way to HTML, which isn’t possible in standard CSS. This allows you as a developer to organise your CSS code in a much more efficient and structured way. Let’s have a look at an example:
nav {
  ul {
    margin: 0;
    padding: 0;
    list-style: none;
  }

  li { display: inline-block; }

}
Once processed using Sass the following CSS file will be generated:
nav ul {
  margin: 0;
  padding: 0;
  list-style: none;
}

nav li {
  display: inline-block;
}
Partials
Partials in Sass allow you to re-use ‘partial’ snippets of CSS code in other Sass files which is a fantastic way of modularising your code and keeping it DRY. To create a partial class you simply prepend the Sass file name with an underscore (e.g. _partial.sccs) and import it using the @import code which is discussed in the following section.
Import
Importing partials in Sass is done by overriding the standard import functionality of CSS; which reduces the current drawback of multiple HTTP requests that the standard CSS @import has. In standard CSS you already have the option to split your CSS code into more maintainable chunks and import the partial code using @import; however in standard CSS this generates multiple HTTP requests which can have a negative effect on page load time. Let’s have a look at an example of using @import in SASS:
// _reset.scss

html,
body,
ul,
ol {
   margin: 0;
}
// base.scss

@import 'reset';

body {
  font: 100% Helvetica;
  background-color: #FFF;
}
This will generate the following CSS when processed using Sass:
html, body, ul, ol {
  margin: 0;
}

body {
  font: 100% Helvetica;
  background-color: #FFF;
}
Mixins
With many vendor specific prefixes on the market it can become tedious to write the same code over and over again; with a great example being border-radius and transitions in CSS. A mixin lets you make groups of CSS declarations that you want to reuse throughout your site; keeping your code DRY. Let’s have a look at an example for border-radius:
@mixin border-radius($radius) {
  -webkit-border-radius: $radius;
     -moz-border-radius: $radius;
      -ms-border-radius: $radius;
          border-radius: $radius;
}

.box { @include border-radius(20px); }

.content { @include border-radius(10px); }
This will generate the following CSS when processed using Sass:
.box {
  -webkit-border-radius: 20px;
  -moz-border-radius: 20px;
  -ms-border-radius: 20px;
  border-radius: 20px;
}

.content {
  -webkit-border-radius: 10px;
  -moz-border-radius: 10px;
  -ms-border-radius: 10px;
  border-radius: 10px;
}
Extend & Inheritance
The @extend function in Sass allows you to keep your code very DRY by reusing properties of selectors by extending them to other selectors. Let’s have a look at an example below:
.message {
  border: 1px solid #ccc;
  padding: 10px;
  color: #333;
}

.success {
  @extend .message;
  border-color: green;
}

.error {
  @extend .message;
  border-color: red;
}
This will generate the following CSS when processed using Sass:
.message, .success, .error {
  border: 1px solid #cccccc;
  padding: 10px;
  color: #333;
}

.success {
  border-color: green;
}

.error {
  border-color: red;
}
Operators
Operators in Sass allow you to use common math functions in your code which is ideal when when calculating widths etc (although using functions is the preferred method). The standard operators available are +, -, *, /, and %. Let’s have a look an example below:
.container { width: 100%; }

article["main"] {
  float: left;
  width: 600px / 960px * 100%;
}

aside[role="complementary"] {
  float: right;
  width: 300px / 960px * 100%;
}
This will generate the following CSS when processed using Sass:
.container {
  width: 100%;
}

article[role="main"] {
  float: left;
  width: 62.5%;
}

aside[role="complementary"] {
  float: right;
  width: 31.25%;
}
Functions
Functions in Sass are great for calculations as they only return a value and don’t generate any CSS. Examples of use could be to calculate widths; which is great for keeping your CSS DRY. Let’s have a look at an example below:
$grid-width: 40px;
$gutter-width: 10px;

@function grid-width($n) {
  @return $n * $grid-width + ($n - 1) * $gutter-width;
}

#sidebar { width: grid-width(5); }
This will generate the following CSS when processed using Sass:
#sidebar {
  width: 240px; }
Conclusion
Using Sass in your ASP.NET web project makes your style sheets Syntactically Awesome, DRY, and more maintainable. For more information on Sass check out the website here.

JAAKALEE ! Do we need a step-2 like : Rt.Click on ur Web Project > Add New Item, and add something like StyleSheet1.scss …
I was, actually wondering ( being new to Preprocessors ) how to “Step-2: Right-click on your .scss file in Solution Explorer” !! Thanks for sharing the post !!
LikeLike