So what is IoT, AI, Slack & Bots anyway?….
Let’s get started with a quick breakdown of what each of these are:
IoT – According to Wikipedia IoT is defined as “The internet of things (IoT) is the network of physical devices, vehicles, buildings and other items—embedded with electronics, software, sensors, actuators, and network connectivity that enable these objects to collect and exchange data“. Think of it basically as anything with an IP address having the ability to connect and exchange data with each other; for example, a vending machine sending a message to a supplier automatically when the stock levels run low.
AI – The Alan Turing website defines AI as “Artificial Intelligence (AI) is usually defined as the science of making computers do things that require intelligence when done by humans. AI has had some success in limited, or simplified, domains.” A great recent example of AI is Siri which is a personal assistant developed by Apple.
Slack – Slack (https://slack.com/is) is a free online communication and collaboration tool used mainly by businesses.
Bots – A Bot is an application which can automate manual tasks and experts say will be the replacement for ‘apps’ in the future. Bots and AI go hand in hand – with Chat Bots performing tasks based on conversations with humans. A great recent example is Google’s Allo. Imagine ordering a pizza through a quick conversation in Facebook Messenger chatting with a Pizza Hut bot…
What is it that we will be building in this tutorial?
In this tutorial we will be building a personal Slack Bot which we can talk to in a conversation style to perform particular tasks for us – with the bot connecting to other entities on the internet to perform the tasks automatically. The code base used is essentially the same for Facebook Messenger and Twilio.
Although this example will be fairly simple (entry level to describe the basic concepts) to get you going; there is nothing stopping you taking this tutorial and creating a specific Slack Bot or Facebook Messenger Bot for your business or personal needs. Just have a look at HelloPegg by Sage at https://www.hellopegg.io/ for a fantastic example.
For example, have your customers message the bot stating “I am locked out of my account” and your Bot could automatically unlock their account using a back end API; or perhaps “Where is my order?” and the Bot could reply with the specific GPS location of the package and how long it will take to be delivered based on the Google maps API. The worlds your oyster..
Contents
1. Getting started with bots.
2. Adding AI responses.
3. How do I deploy my bot to Heroku rather than a development environment?
Getting started with bots.
1. Sign up a free Slack account at https://slack.com/ following all of the on-screen instructions to get setup. This will include setting up your team room that you can invite other users too.
My name on Slack is leejames and my team room is https://leejames.slack.com
Now you need to create your Bot User; with Slack specifically endorsing Howdys BotKit. They describe it as
One easy way to build bot users, especially if you already work with Node.js, is Howdy’s Botkit. Botkit is a framework that takes care of most these API gymnastics, so you can focus on your bot’s behavior.
To grab a copy of BotKit from Git Hub you will also need to have Node.js and NPM installed on your machine.
2. If you haven’t already installed Node.js you can install it for Windows at https://nodejs.org/en/ . Follow the on-screen instructions and install.
3. Open up a command prompt or Power Shell in Windows and type in node -v

Ensure that the version number comes back which indicated Node.js is installed.
4. Now type in npm -v and ensure that the version number comes back correctly:

5. Now that you have Node and NPM setup you can go ahead and install BotKit using the following command:
npm install --save botkitor alternatively you could download the code manually from here https://github.com/howdyai/botkit, unzip it, open up a command prompt, cd to the directory, and type in:
npm install6. Now make a bot integration inside of your Slack channel. Go here:
https://my.slack.com/services/new/bot
Enter a name for your bot; mine is called ‘leejamesbot‘.
7. When you click “Add Bot Integration”, you are taken to a page where you can add additional details about your bot, like an avatar, as well as customise its name & description.
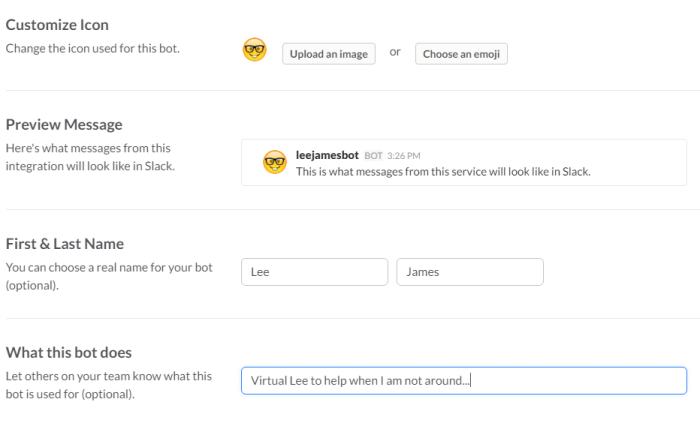
Copy the API token that Slack gives you. You’ll need it to put inside your slack_bot.js file.
8. Run the example bot app, using the token you just copied:
token=REPLACE_THIS_WITH_YOUR_TOKEN node slack_bot.jsor.. directly edit your slack_bot.js file commenting out the following lines:
//if (!process.env.token) {
// console.log('Error: Specify token in environment');
// process.exit(1);
//}
and inserting the token directly into the code:
var bot = controller.spawn({
//token: process.env.token
token: 'xxx-xxxxxxxxxxxx-xxxxxxxx'
}).startRTM();
Now you can just run the following command in your cmd prompt to start your Bot:
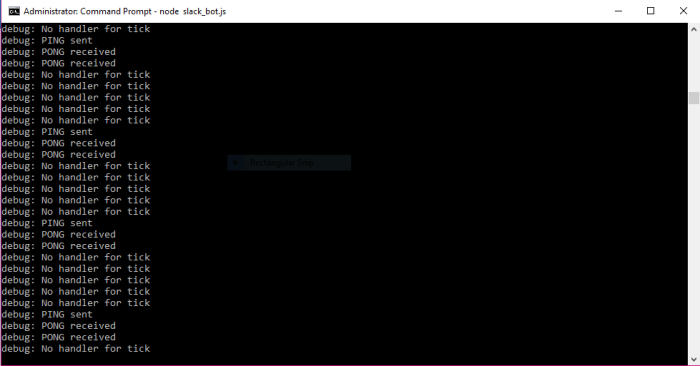
node slack_bot.js9. You will see now in your command prompt/power shell prompt that your slack bot is now running and listening for any input from Slack (whether it be the Slack website, phone app or desktop app):
10. Go back into Slack > Click on your bot > and say “Hello“..you will get a response.. then type in “Call me <insert your name here>“.. you should now be interacting with your bot and getting intuitive responses:
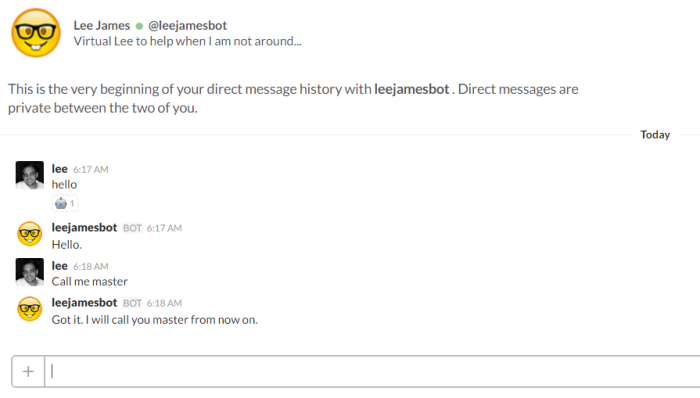
The code you are interacting with is simply the slack_bot.js JavaScript code on the following lines:
controller.hears(['hello', 'hi'], 'direct_message,direct_mention,mention', function(bot, message) {

bot.api.reactions.add({
timestamp: message.ts,
channel: message.channel,
name: 'robot_face',
}, function(err, res) {
if (err) {
bot.botkit.log('Failed to add emoji reaction :(', err);
}
});
and the following JavaScript code for the “Call me..” response:
controller.hears(['call me (.*)', 'my name is (.*)'], 'direct_message,direct_mention,mention', function(bot, message) {
var name = message.match[1];
controller.storage.users.get(message.user, function(err, user) {
if (!user) {
user = {
id: message.user,
};
}
user.name = name;
controller.storage.users.save(user, function(err, id) {
bot.reply(message, 'Got it. I will call you ' + user.name + ' from now on.');
});
});
});
These responses are simply the responses that come as default in the slack_bot.js boiler plate code from the GitHub repo; but you can now go ahead and customise your responses depending on yours or your businesses needs specifically.
Adding AI responses
OK, so its not very useful getting canned responses from a Bot – what is more useful is your Bot interacting with other entities on the internet. This could be a GPS tracker, a back end system using an API, a webcam, your phone, an iPad, server, anything that has an IP address! For this next part we are going to hit an externally hosted API to get specific information based on the users input through Slack.
1. First of all lets install the ‘request’ module for Node if you don’t already have it by typing the following into NPM in your command prompt:
npm install request2. Now go into your slack_bot.js file and add the following request line:
var Botkit = require('./lib/Botkit.js');
var os = require('os');
var request = require('request');
Adding the request line now means we can do restful HTTP calls to external APIs outside of Node.. this could be your own internal business API returning stock information from a database, or an external API like Bing or Google Maps returning GIS data based on user input in the conversation.
3. Now for this example I have created a really simple local ASP.NET Web API application to mimic a real world business application which stores orders with specific RESTful end points. My Web API controllers look like this for the very basic example; with the list items mocking the data coming from the database:
[RoutePrefix("api/Orders/")]
public class OrdersController : ApiController
{
[HttpGet()]
[Route("DispatchDate/{id}")]
[ResponseType(typeof(string))]
public IHttpActionResult GetDispatchDate(int id)
{
List<Order> orderList = new List<Order>();
Order itemOne = new Order() { OrderId = 1111, DispatchDate = DateTime.Parse("11/07/2016 12:30:00") };
Order itemTwo = new Order() { OrderId = 2222, DispatchDate = DateTime.Parse("28/07/2016 01:00:00") };
Order itemThree = new Order() { OrderId = 3333, DispatchDate = DateTime.Parse("31/08/2016 22:00:00") };

orderList.Add(itemOne);
orderList.Add(itemTwo);
orderList.Add(itemThree);

DateTime selectedOrderDate = orderList.Where(x => x.OrderId == id).Select(x => x.DispatchDate).SingleOrDefault();

if (selectedOrderDate == DateTime.MinValue)) return Ok("Sorry I can't seem to find that order number.");

return Ok(string.Format("{0:f}", selectedOrderDate));
}
}
5. Now edit your slack_bot.js and add the following code:
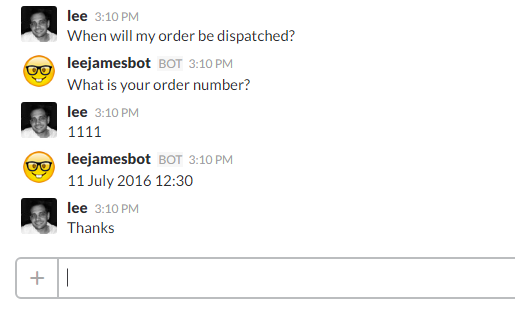
controller.hears(['order'], ['mention', 'direct_mention', 'direct_message'], function(bot,message){
bot.startConversation(message, function(err, convo) {
convo.ask('What is your order number?', function(response, convo) {
request('http://localhost:8293/api/Orders/DispatchDate/' + convo.extractResponse('ordernumber'), function (error, response, body) {
if (!error && response.statusCode == 200) {
var data = JSON.parse(body);
bot.reply(message, data);
convo.next();
}
})
},{'key': 'ordernumber'});
});
});
Now when the Bot hears the word order it will ask the user what their order number is; and then automatically reply with the corresponding dispatch date for that specific order ID from our fictitious order system as shown below:
Although this is a very simple entry level example it does show the power of bots automating tasks on behalf of customers through a conversation powered interface. As discussed earlier this is not just limited to Slack either, you can use Botkit with Facebook Messenger, Twillio and more.
How do I deploy my bot to Heroku rather than a development environment?
OK, so because we have set this up locally, as soon as we restart the machine or stop node from running locally we will then lose the ability for our bot to reply.. the way around this is to obviously host the Slack Bot somewhere online. In this tutorial we are going to use Heroku.
1. Sign up for a free account on https://www.heroku.com/.
2. Fill in your details and make sure you choose ‘Node‘ for your account type.

3. Log into the account and click on ‘Create New App‘:

4. Add the name of your bot (app) and choose the area you would like to run it in:

5. Click on ‘Connect to Git Hub‘

6. Authorise Heroku to access your GitHub account.
7. Create a new Repo in GitHub for your bot

8. Go back into Heroku and link your app to your GitHub repo:

9. Now in GIT clone into your botkit folder.
10. You should now be able to sync you files with Git:

11. Now revert your slack_bot.js code to how it was originally with the token passed into the running app at run time as we don’t want people to see this token in GitHub. Instead we will pass this in through the environment variables in Heroku which you can do in your settings tab (obviously that is not my real token in the screenshot):

12. Now create a Procfile with the following contents:
worker: node slack_bot.js
In Heroku we could have a Web app which creates a more traditional web application, or we can have a Worker application which runs in the background (which is the type of application we want) More information on creating a Procfile can be found here: https://devcenter.heroku.com/articles/procfile
13. Now commit and sync your changes up to GitHub.
14. In the Heroku dashboard go back to your ‘Deploy‘ tab and click on ‘Deploy’ branch (https://devcenter.heroku.com/articles/github-integration#manual-deploys) This will automatically install the BotKit modules by looking in your package.json file for dependencies (our .gitignore file had the following line so we didn’t commit our locally installed modules to GitHub; we want Heroku to install them)
node_modules/
Now that we have the application deployed we need to scale it to set the web worker dyno to 0 and the worker process to 1. (For more information on scaling look at https://devcenter.heroku.com/articles/scaling)
If we were to just run the slack bot as a web process we would find that it would only run for around 60 seconds and then fail due to the fact it is not running as a worker. You would see a similar error in your Heroku activity log:
heroku[web.1]: Error R10 (Boot timeout) -> Web process failed to bind to PORT within 60 seconds of launch
15. We now need more control when working with Heroku at this point so we need to download and install the Heroku Toolbelt. The link to the download is here https://toolbelt.heroku.com/
16. After successfully installing the Heroku Toolbelt open up Windows Powershell and cd to your local GIT project:
cd c:\users\lee\Documents\GitHub\leejamesbot17. Log in to Heroku with the following command and entering your credentials:
heroku loginand create a remote to your existing repository (where project is the name of your app):
git remote add heroku git@heroku.com:project.git18. Create a new SSH key by typing the following command and choosing Yes (https://devcenter.heroku.com/articles/keys):
heroku keys:add19. Push using the following command:
git push heroku master20. Now we need to scale the dynos using the following command:
heroku ps:scale web=0 worker=1Now you should be able to say hello to your bot in Slack and get a response regardless of your development machine being started!
Wrapping Up
Hopefully this post has given you a taster for what bots can achieve with some very basic quick steps to get you started. I will be writing a further post on using Microsoft Cognitive Services along with the Microsoft Bot Framework to take this a level further..
